[00] 프레임 워크와 창 생성
Tutorial 2: Creating a Framework and Window
Tutorial 2: Creating a Framework and Window Before starting to code with DirectX 11 I recommend building a simple code framework. This framework will handle the basic windows functionality and provide an easy way to expand the code in an organized and read
www.rastertek.com
DirectX11의 공부 목적으로 위 링크의 튜토리얼을 보고 제 생각을 포함하여 정리하였습니다.
들어가며
win api를 자세히 보기보다 렌더링 부분을 먼저 공부 하고 싶기 때문에 지금 시간인 세팅 부분은 간단하게 넘어가려한다.
● 프로젝트 생성시 'win32 console applicaiton' 는 'windows desktop application' 으로 변경 되었다.
프레임 워크는 네 클래스로 시작된다.
1. 앱의 진입점인 WinMain 함수
2. WinMain의 기능을 캡슐화한 SystemClass
3. 사용자의 키보드 입력을 처리하기 위한 InputClass
4. DirectX의 그래픽 코드를 처리하기 위한 ApplicationClass
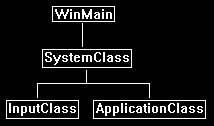
이 네 클래스를 자세히 살펴보겠습니다.
main.cpp
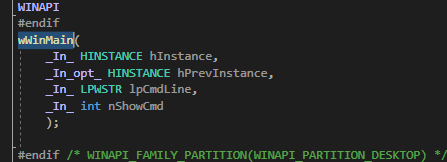
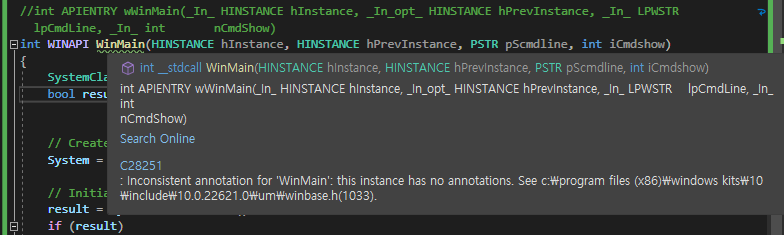
내가 사용하는 vs에서는 WinMain이 APIENTRY wWinMain으로 생성되었었다.
기본 WinMain과 큰 차이는 없지만 튜토리얼과 같이 WinMain함수로 변경하여 간단하게 만들고 메인작업들을 System class를 이용해 캡슐화하여 사용한다.
#include "systemclass.h"

int WINAPI WinMain(_In_ HINSTANCE hInstance, _In_opt_ HINSTANCE hPrevInstance,	_In_ LPSTR lpCmdLine, 	_In_ int nShowCmd
)
{
	SystemClass* System;
	bool result;

	// 새로운 개체 생성.
	System = new SystemClass;

	// System 개체 초기화 후 실행.
	result = System->Initialize();
	if (result)
	{
		System->Run();
	}

	// System 개체 종료 후 메모리 해제
	System->Shutdown();
	delete System;
	System = 0;

	return 0;
}
튜토리얼의 코드대로 작성하게 되면 이런 경고가 나오는데, 이는 주석 코드(SAL)이 없기 때문에 발생한 경고다.
WinMain의 함수 정의에 SAL이 사용되었기 때문에 정의에서도 사용해주어야 한다.
System.h
#ifndef _SYSTEMCLASS_H_
#define _SYSTEMCLASS_H_

// 암호화, DDE, RPC, 셸 및 Windows 소켓과 같은 API를 제외 하여 빌드 프로세스 속도를 향상
#define WIN32_LEAN_AND_MEAN

// win32 함수를 사용하려는 목적인 windows.h 포함
#include <windows.h>
#include "inputclass.h"
#include "applicationclass.h"

class SystemClass
{
public:
	SystemClass();
	SystemClass(const SystemClass&);
	// 소멸자가 호출되지 않을 수도 있는 경우가 있기 때문에 소멸 작업은 Shutdown함수에 구현.
	// 그래서 기본 소멸자에 아무것도 없으므로 default 사용
	~SystemClass() = default;

	bool Initialize();
	void Shutdown();
	void Run();

	// Windows 시스템 메시지를 처리하기 위한 핸들
	LRESULT CALLBACK MessageHandler(HWND, UINT, WPARAM, LPARAM);

private:
	// 실질적으로 매 프레임마다 앱의 처리를 담당
	bool Frame();
	// 앱의 초기화 작업
	void InitializeWindows(int&, int&);
	// 앱의 종료시 작업
	void ShutdownWindows();

private:

	LPCWSTR m_applicationName;
	HINSTANCE m_hinstance;
	HWND m_hwnd;

	// 우리가 만든 클래스
	InputClass* m_Input;
	ApplicationClass* m_Application;
};


static LRESULT CALLBACK WndProc(HWND, UINT, WPARAM, LPARAM);
static SystemClass* ApplicationHandle = 0;

#endif
WinMain의 작업들을 캡슐화하기 위한 클래스.
처음의 WIN32_LEAN_AND_MEAN은 빌드시 암호화, DDE, RPC, 셸 및 Windows 소켓과 같은 API를 제외 하여 빌드 프로세스 속도를 향상시켜준다.
System.cpp
1. 생성자
SystemClass::SystemClass()
{
	// 우리가 만든 클래스의 개체
	m_Input = nullptr;
	m_Application = nullptr;
}
생성자는 개체의 초기화만 들어있다. 응용 프로그램에서는 개체가 null이 아니면 해당 개체를 정리하려고 시도한다고 하는데 이는 쓰레기 값이 들어지 않게 하려는 의도인거 같다.
또한 응용 프로그램에서는 모든 포인터와 변수를 null로 초기화 하지 않으면 일부 릴리즈 빌드가 실패할수 있다고 한다.
나는 보다 명확한 nullptr으로 초기화 하였다.
2. 소멸자
빈 소멸자이기에 코드는 없다. 소멸자가 호출되지 않을 수도 있는 경우가 있기 때문에 소멸시 작업은 모두 Shoutdown함수에 구현되었다.
3. Initialize
bool SystemClass::Initialize()
{
	int screenWidth, screenHeight;
	bool result;

	screenWidth = 0;
	screenHeight = 0;

	// windows api 초기화.
	InitializeWindows(screenWidth, screenHeight);

	// m_Input은 사용자의 키보드 입력을 처리하는데 사용된다.
	m_Input = new InputClass;
	m_Input->Initialize();

	// m_Application은 모든 그래픽 렌더링을 처리한다.
	m_Application = new ApplicationClass;
	result = m_Application->Initialize(screenWidth, screenHeight, m_hwnd);
	if (!result)
	{
		return false;
	}
	return true;
}
평범한 초기화 함수.
4. Shoutdown
void SystemClass::Shutdown()
{
	// 클래스 개체들을 메모리 해제.
	{
		if (m_Application)
		{
			m_Application->Shutdown();
			delete m_Application;
			m_Application = 0;
		}

		if (m_Input)
		{
			delete m_Input;
			m_Input = 0;
		}
	}

	// 창 종료
	ShutdownWindows();

	return;
}
모든 개체를 메모리 해제 후 창을 종료한다.
5. Run
함수 Run의 수도 코드와 실제 코드이다.
while ( 실행중 )
    1. Windows 시스템 메시지 확인
    2. 시스템 메시지 처리
    3. 응용 프로그램 루프
    4. 프레임 처리 (처리 중에 사용자가 종료하기를 원하는지 확인)
void SystemClass::Run()
{
MSG msg;
bool done, result;
// 메세지 구조 초기화
ZeroMemory(&msg, sizeof(MSG));
// 창이나 사용자로부터 종료 메세지가 나타날 때까지 반복한다.
// done이 true면 앱의 종료라는 뜻이다.
done = false;
while (!done)
{
// 윈도우 메세지의 처리
if (PeekMessage(&msg, NULL, 0, 0, PM_REMOVE))
{
TranslateMessage(&msg);
DispatchMessage(&msg);
}
// Window가 앱을 종료하라는 신호를 보내면 종료한다.
if (msg.message == WM_QUIT)
{
done = true;
}
else
{
// 종료 신호가 아니라면 프레임 처리를 수행한다.
result = Frame();
if (!result)
{
done = true;
}
}
}
return;
}Run 함수는 애플리케이션이 반복되고 모든 애플리케이션의 처리를 수행하는 곳이다. 실질적으로 애플리케이션의 처리는 Frame함수에서 하게 된다.
6. Frame
프레임마다 그래픽 작업을 수행하는 함수
bool SystemClass::Frame()
{
	bool result;

	// 사용자가 ESC를 누르고 앱을 종료하려고하는지 확인.
	if (m_Input->IsKeyDown(VK_ESCAPE))
	{
		return false;
	}

	// Application 개체를 이용하여 프레임의 그래픽 작업을 수행한다.
	result = m_Application->Frame();
	if (!result)
	{
		return false;
	}

	return true;
}
7. MessageHandler
MessageHandler 함수는 Windows 시스템 메세지를 가져와 전달하는 함수
LRESULT CALLBACK SystemClass::MessageHandler(HWND hwnd, UINT umsg, WPARAM wparam, LPARAM lparam)
{
	switch (umsg)
	{
		// 키보드에서의 키가 눌렸는지 확인.
		case WM_KEYDOWN:
		{
			// 키를 누르면 해당 상태를 저장할 수 있도록 Input개체에 전송한다.
			m_Input->KeyDown((unsigned int)wparam);
			return 0;
		}

		// 키보드에서 키가 해제되었는지 확인.
		case WM_KEYUP:
		{
			m_Input->KeyUp((unsigned int)wparam);
			return 0;
		}

		// 앱에서 사용하지 않는 다른 메세지는 기본 WinAPI메세지 핸들러로 전송한다.
		default:
		{
			return DefWindowProc(hwnd, umsg, wparam, lparam);
		}
	}
}
여기서 우리는 관심 있는 특정 메세지만을 Input 개체에 전송한다. 우리가 필요없는 다른 메세지는 기본 Windows 메세지 핸들러로 전송한다.
8. InitializeWindows
렌더링에 사용할 창을 빌드하기 위한 함수
void SystemClass::InitializeWindows(int& screenWidth, int& screenHeight)
{
	WNDCLASSEX wc;
	DEVMODE dmScreenSettings;
	int posX, posY;


	// System클래스의 포인터를 가져온다.
	ApplicationHandle = this;

	// HInstance는 앱(프로그램)의 핸들을 말한다. 운영체제가 제공해주는 핸들을 GetModuleHandle을 통해 가져온다.
	m_hinstance = GetModuleHandle(NULL);

	// 앱의 이름을 작성.
	m_applicationName = L"Engine";

	// 윈도우 클래스의 변수들을 작성한다. (앱의 창 크기, 앱의 핸들, ...)
	wc.style = CS_HREDRAW | CS_VREDRAW | CS_OWNDC;
	wc.lpfnWndProc = WndProc;
	wc.cbClsExtra = 0;
	wc.cbWndExtra = 0;
	wc.hInstance = m_hinstance;
	wc.hIcon = LoadIcon(NULL, IDI_WINLOGO);
	wc.hIconSm = wc.hIcon;
	wc.hCursor = LoadCursor(NULL, IDC_ARROW);
	wc.hbrBackground = (HBRUSH)GetStockObject(BLACK_BRUSH);
	wc.lpszMenuName = NULL;
	wc.lpszClassName = m_applicationName;
	wc.cbSize = sizeof(WNDCLASSEX);

	// 위에서 작성한 설정 값을 등록한다.
	RegisterClassEx(&wc);

	// 사용자의 모니터 해상도를 가져온다.
	screenWidth = GetSystemMetrics(SM_CXSCREEN);
	screenHeight = GetSystemMetrics(SM_CYSCREEN);

	// 전체 화면으로 실행하는지, 창 모드로 실행하는지에 따라 화면 설정을 설정합니다.
	if (FULL_SCREEN)
	{
		// 전체 화면인 경우 화면을 사용자 데스크톱의 최대 크기 및 32비트로 설정합니다.
		memset(&dmScreenSettings, 0, sizeof(dmScreenSettings));
		dmScreenSettings.dmSize = sizeof(dmScreenSettings);
		dmScreenSettings.dmPelsWidth = (unsigned long)screenWidth;
		dmScreenSettings.dmPelsHeight = (unsigned long)screenHeight;
		dmScreenSettings.dmBitsPerPel = 32;
		dmScreenSettings.dmFields = DM_BITSPERPEL | DM_PELSWIDTH | DM_PELSHEIGHT;

		// 디스플레이 세팅을 전체 화면으로 변경한다.
		ChangeDisplaySettings(&dmScreenSettings, CDS_FULLSCREEN);

		// 창의 위치를 왼쪽 상단으로 설정한다.
		posX = posY = 0;
	}
	else
	{
		// 창 모드인 경우 해상도를 800x600으로 설정합니다.
		screenWidth = 800;
		screenHeight = 600;

		// 창을 화면 중앙에 배치하게끔 왼쪽 상단 position을 구하여 설정한다.
		posX = (GetSystemMetrics(SM_CXSCREEN) - screenWidth) / 2;
		posY = (GetSystemMetrics(SM_CYSCREEN) - screenHeight) / 2;
	}

	// 화면 설정으로 창을 만들고 이에 대한 핸들을 가져온다.
	m_hwnd = CreateWindowEx(WS_EX_APPWINDOW, m_applicationName, m_applicationName,
		WS_CLIPSIBLINGS | WS_CLIPCHILDREN | WS_POPUP,
		posX, posY, screenWidth, screenHeight, NULL, NULL, m_hinstance, NULL);

	// 창을 띄워 메인 포커스로 설정한다.
	ShowWindow(m_hwnd, SW_SHOW);
	SetForegroundWindow(m_hwnd);
	SetFocus(m_hwnd);

	// 마우스 커서를 숨긴다.
	ShowCursor(false);

	return;
}
. 주석으로 어떤 역할인지 알기 쉽다. FULL_SCREEN 전역 변수는 Application class에 있는데 이는 나중에 이해가 될 것이라 한다.
9. ShoutdownWindows
화면 설정을 다시 정상으로 되돌리고 창과 관련된 핸들을 해제하는 함수.
void SystemClass::ShutdownWindows()
{
	// Show the mouse cursor.
	ShowCursor(true);

	// 전체 화면을 종료하는 경우 디스플레이 설정을 수정한다.
	if (FULL_SCREEN)
	{
		ChangeDisplaySettings(NULL, 0);
	}

	// Remove the window.
	DestroyWindow(m_hwnd);
	m_hwnd = NULL;

	// Remove the application instance.
	UnregisterClass(m_applicationName, m_hinstance);
	m_hinstance = NULL;

	// Release the pointer to this class.
	ApplicationHandle = NULL;

	return;
}
10. WndProc
Windows가 메세지를 보내는 함수
LRESULT CALLBACK WndProc(HWND hwnd, UINT umessage, WPARAM wparam, LPARAM lparam)
{
	switch (umessage)
	{
		// Check if the window is being destroyed.
		case WM_DESTROY:
		{
			PostQuitMessage(0);
			return 0;
		}

		// Check if the window is being closed.
		case WM_CLOSE:
		{
			PostQuitMessage(0);
			return 0;
		}

		// 다른 메세지는 System 클래스의 MessageHandler 함수로 전달된다.
		// 이곳으로 메세지가 들어오는 이유는 Initialize 함수에서 wc.lpfnWndProc = WndProc으로 지정했기 때문.
		default:
		{
			return ApplicationHandle->MessageHandler(hwnd, umessage, wparam, lparam);
		}
	}
}
InputClass.h
사용자의 키보드 입력을 처리하는 클래스.
이러한 입력처리는 DirectInput이 더 우수하지만 튜토리얼을 단순하게 유지하기 위해 사용.
아까 보았던 SystemClass::MessageHandler 함수에서 이 InputClass 개체로 메세지를 전달해준다.
#pragma once
#ifndef _INPUTCLASS_H_
#define _INPUTCLASS_H_

class InputClass
{
public:
	// 빈 생성자, 빈 소멸자이기에 default를 사용했다.
	InputClass() = default;
	InputClass(const InputClass&);
	~InputClass() = default;

	void Initialize();

	void KeyDown(unsigned int);
	void KeyUp(unsigned int);

	bool IsKeyDown(unsigned int);

private:
	bool m_keys[256];
};

#endif
키의 저장은 m_keys라는 배열에 저장하게 되고 키에 대한 쿼리를 받으면 그 키에 대한 index를 찾아 호출 기능에 알려주는 형식이다.
InputClass.cpp
간단한 cpp 파일
#include "InputClass.h"

InputClass::InputClass(const InputClass& other)
{
}

void InputClass::Initialize()
{
	// 키의 값을 누르지 않은 뜻인 false로 모두 초기화
	for (int i = 0; i < 256; i++)
	{
		m_keys[i] = false;
	}

	return;
}


void InputClass::KeyDown(unsigned int input)
{
	// If a key is pressed then save that state in the key array.
	m_keys[input] = true;
	return;
}


void InputClass::KeyUp(unsigned int input)
{
	// If a key is released then clear that state in the key array.
	m_keys[input] = false;
	return;
}


bool InputClass::IsKeyDown(unsigned int key)
{
	// 키가 눌렸는지, 눌리지 않았는지의 상태를 반환한다.
	return m_keys[key];
}
ApplicationClass.h
앱의 모든 그래픽 기능은 이 클래스에 캡슐화되어 사용된다. 또한 해상도 변경 등 모든 그래픽 관련 전역 설정에 대해 이 파일의 헤더를 사용할 것이다.
향후 튜토리얼의 모든 그래픽 개체를 포함하게 된다.
#pragma once
#ifndef _APPLICATIONCLASS_H_
#define _APPLICATIONCLASS_H_

#include <windows.h>

const bool FULL_SCREEN = false;
const bool VSYNC_ENABLED = true;
const float SCREEN_DEPTH = 1000.0f;
const float SCREEN_NEAR = 0.3f;

class ApplicationClass
{
public:
	ApplicationClass();
	ApplicationClass(const ApplicationClass&);
	~ApplicationClass();

	bool Initialize(int, int, HWND);
	void Shutdown();
	bool Frame();

private:
	bool Render();

private:
};
#endif
Application.cpp
지금 시간에서는 별다를게 없어 모두 비워져 있다!
요약
기본적인 프레임워크를 구성하고 앱의 창을 띄웠다.
주석만 따라간다면 크게 어려운것은 없었다.
